CloudVoice offers a virtual fax service that enables several ways to send fax data including email to fax, a software fax printer and a physical fax to fax using fax ATA hardware. Below is the faxing guide.

Getting Started
Once your purchase of the ITS Fax has been processed, you will receive an email that contains login information. Be sure log this information below for future reference.
Username: ______________________ Password: ____________________ ITS FAX #: ____________________
IMPORTANT NOTE This information is to INSTALL THE PRINT DRIVER onto your computer, NOT to access your ITS Fax web portal. To access the ITS Fax web portal (with the log-in information provided to you in the email received at time of purchase)
- Download the 64 bit application (https://cloudvoicehelp.encoretg.net/troubleshooting/faxconfig/InternetFax-64bits.zip) or the 32 bit application (https://cloudvoicehelp.encoretg.net/troubleshooting/faxconfig/InternetFax-32bits.zip)
- Unzip the downloaded .zip file.
- Run “setup.exe”
- Install with the settings you wish. (Keeping the default settings is recommended)
- Find the little white globe in the system tray. The system tray is the area with icons next to the clock in the start menu.
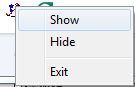
 6. Right click the white globe and click show.
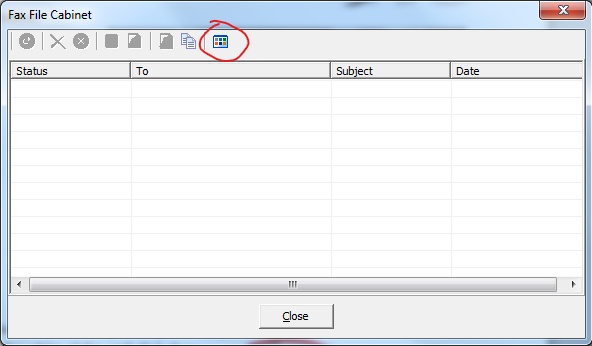
 7. In the Fax File Cabinet window click the Settings button.
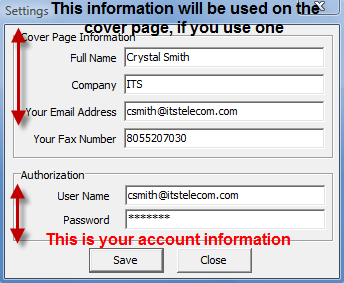
 8. Fill out the new window EXACTLY as it was filled out for you on the email you received from ITS.
* Populate the top section with your Name, Company, Email Address and Fax number. This
information will be displayed on any cover page if you choose to add one to an outgoing fax.
* In the Authorization section, enter your account information that was given to you when you
signed up for the ITS Fax service. (Username and Password in email from ITS) Then click the save button.
8. Fill out the new window EXACTLY as it was filled out for you on the email you received from ITS.
* Populate the top section with your Name, Company, Email Address and Fax number. This
information will be displayed on any cover page if you choose to add one to an outgoing fax.
* In the Authorization section, enter your account information that was given to you when you
signed up for the ITS Fax service. (Username and Password in email from ITS) Then click the save button.
- Click Save.
- Close the Fax File Cabinet window.
Print to Fax
IMPORTANT NOTE The ITS Print to Fax function is not compatible with Mac computers, only PC’s.
- From the application that you’ve created the document that you want to fax, select File-> Print
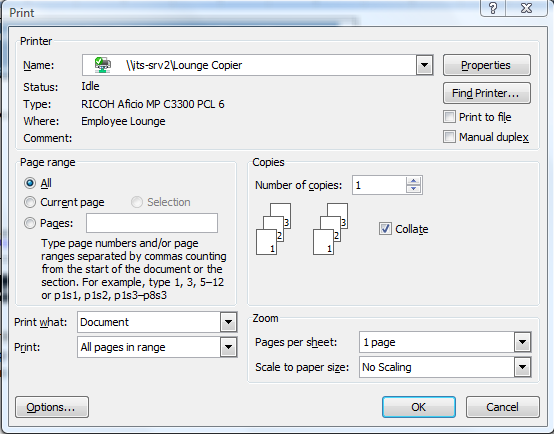
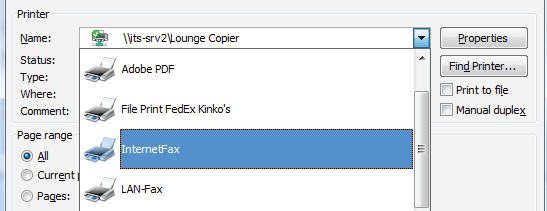
- Select the Internet Fax printer from the list of printers
- Select OK to print the document
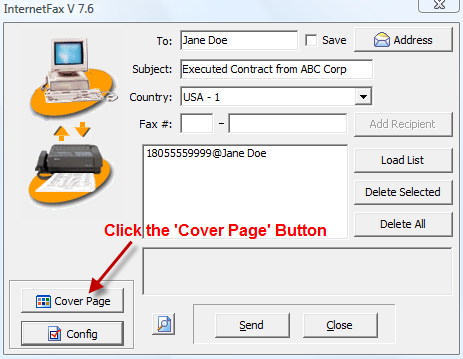
- Enter in the recipient information and Click Add Recipient
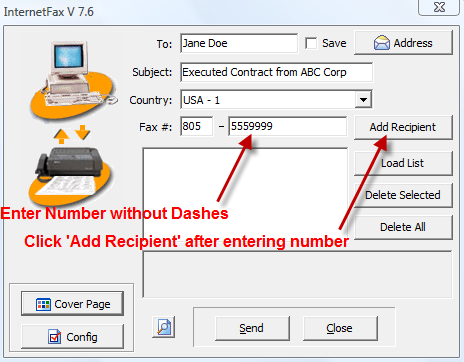
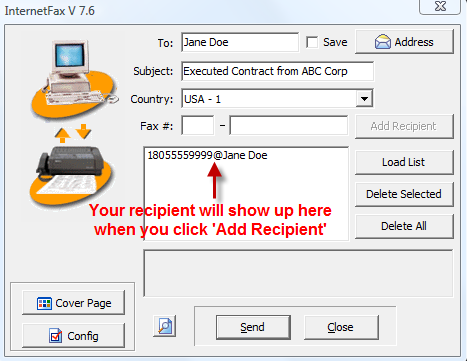
- After you click Add Recipient, your recipient will be added to the list. (The “1” will automatically be added to the phone number after adding recipient to the list)
- Add another if you want by entering info for another recipient and clicking Add Recipient
- Add a cover page by clicking the ‘Cover Page’ button.
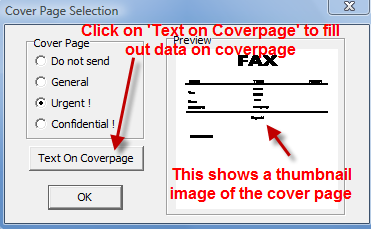
- Select one of the 3 cover page types.
- Click on ‘Text On Coverpage’ to fill out data for cover page
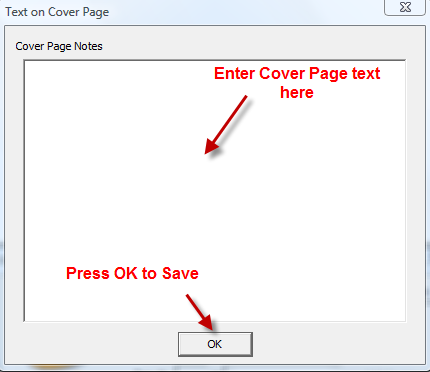
- Input information that you want to be put on the cover page.
- Click on the OK button to save
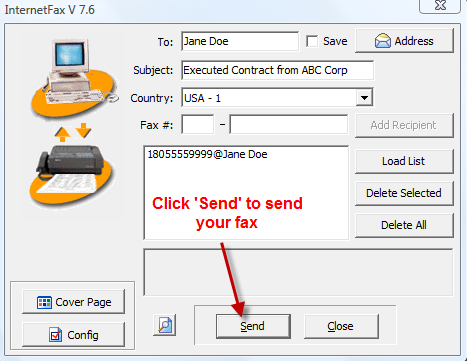
- To send your fax, click ‘Send’.
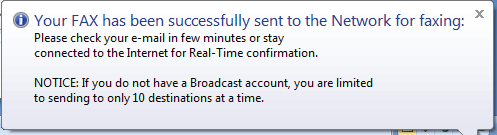
- Note this screen which confirms that the system has received your fax and is attempting to send.
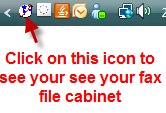
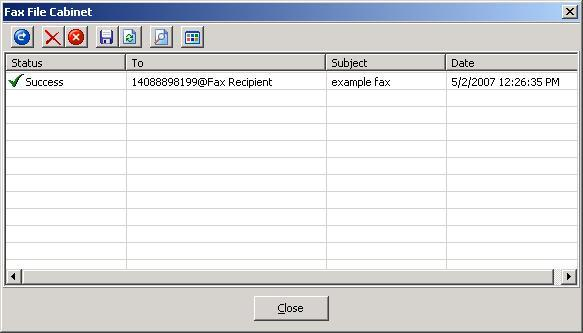
- To see your fax file cabinet (queue of faxes), click on the world icon on your computer’s tool bar.
- This shows your fax waiting to be sent. You can keep this open to see when your fax is successfully sent by the system to your recipient, or you can close it and wait for your email confirmation.
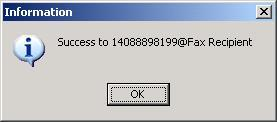
- This screen confirms your fax was successfully sent. You will also receive an email confirmation.
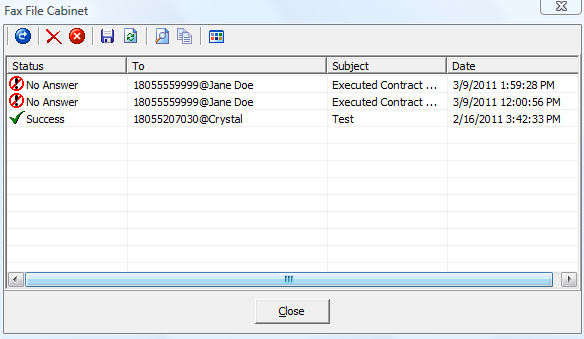
- The queue screen also shows that the fax was successfully sent
Email to Fax
IMPORTANT NOTE ITS Email to Fax is only available for use by the original email address which the ITS Fax was purchased/registered with.
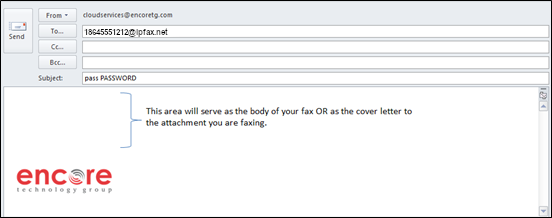
- Open a new email
- In the To… field, enter the fax number in the following format: Destinationnumber@ipfax.net
- (The destination number should be a 10 digit number that includes a “1” and the area code.
- In the Subject: field, enter the word pass, a space, and then your password. Your default password is 123456.
- The body of the email will act like the cover page to an attachment or will serve as the fax if no attachment is added.
- Press the Send button to send the fax.
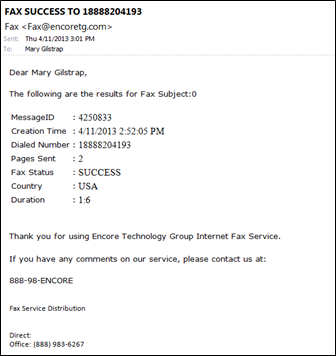
- A fax confirmation will be sent in an email and will look like the following: